Solve 3D printing filament humidity problems with a dry box
If filament gets too moist because of high humidity, it causes problems. So I made some dry boxes to keep my filament dry when I am printing with it.
I thought that because it is the middle of March, that I'd have several months to experiment with desiccant, sealed boxes, humidity meters, etc. But a few days ago the temperature got up to 70 (F) and the humidity outside was over 70%. So I skipped the cautious experiments and made some dry boxes for the filament I was printing with right now.
I had already bought a gallon of indicating desiccant, muslin bags, a length of PTFE tube for 1.75mm filament, a single air-tight box and a temp/humidity meter that supported multiple sensors, so I went to work with this, and things I already had in the house (namely several filament spool holders and four hose clamps (the retainer is about 20mm in diameter, which is close to 3/4 inch. You could go a bit larger with the hose clamps, if you want.))
Probably not needed. The PTFE tube in the box top should be tight enough, if you have a light touch with the needle file in the next step. Only use these clamps if the PTFE tube won't stay in the box top.
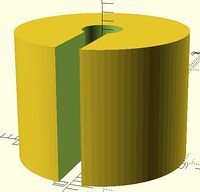
I wanted to use hose clamps to make an air tight seal around the PTFE tube that goes through the hole that I'd drill in the air-tight box. Hose clamps are too large to clamp PTFE tube, so I designed a cylinder that was designed to grip the PTFE tube. The hose clamp grips the cylinder and the cylinder tightens to grip the PTFE tube. You need to make two for each box; one for the top (outside) and a second for the bottom (inside).
Download the OpenSCAD script here (I printed it at the lowest resolution with 10% infill. Because I want the walls and infill to be thin and flimsy. So it will flex when the hose clamp is tightened. This is not a good application for strong and rigid.)
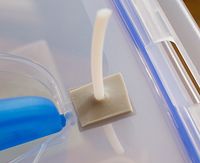
I used a 5/32" drill bit to make a hole in the top of my air-tight box that was just a little bit smaller than the PTFE tube. I then used a round needle file to gradually enlarge the hole so the PTFE tube just barely fit. I cut two squares of gasket material a bit larger than the retainers. I used an 11/64" bit to make a hole through the gasket. I poked the PTFE tube through the top of the box and slid the gasket material over the tube.
Probably don't need this. If you do, don't tighten too hard so that you restrict the filament feed.
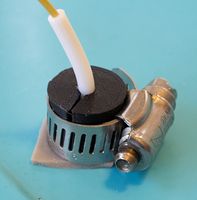
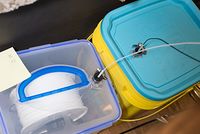
I put a hose clamp around one of the retainers that I 3D printed, put it around the PTFE tube and tightened it down. (Different box shown.) I did the same thing on the bottom of the box top (gasket, retainer, and hose clamp.) I fiddled with the retainers/hose clamps until I had them as snug as I could against the box top.
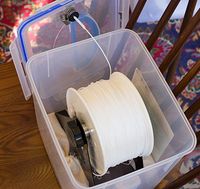
Then I put my roll of filament, bags of desiccant and a humidity sensor in the box.
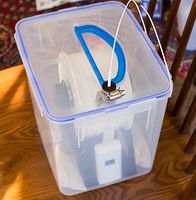
and closed the lid
The filament is a 1kg roll of Bumat Elite. A 1kg roll of Hatchbox filament won't fit in this box. My other roll is the same size as a 1kg roll of Hatchbox, which is why I needed to use the larger kitty litter box. I'm using Hatchbox spool holders.
I repeated the procedure with the only other box that fit my other filament spool and might be air tight (an empty kitty litter box.) Here are both of the completed dry boxes behind my printer.
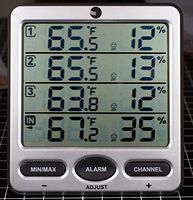
Here are the humidity readings of my three dry boxes (I put my unused filament in another, larger air-tight box along with my third sensor.) The first three readings are from my air tight boxes. The fourth line is the ambient tempreture and humidity.
I did do a brief test before starting construction. As I said, it was 70 degrees (F) outside with 70+ per cent humidity. I put the storage air tight box outside with a 2nd sensor on top of if. I waited about an hour. The sensor on top of the box read 70+ percent humidity but the one inside the air tight box still read in the low teens. (The manufacturer rates the sensors as having a minimum low limit of 10%, so I expect some drifting when the actual humidity gets in the 10% range.)

If you don't want to use an electronic humidity meter, you can use humidity indicator cards. Blue == dry; pink == humid.
The card at the left is in a sealed envelope with desiccant. The card on the right has been out in a room for several days. Our ambient humidity is about 35 percent, so the bottom dots are pinkish on the right card. When a card was put in one of the dry boxes (with bags of desiccant), most the dots are blue (like the left card here.)
If your dry box is transparent, you can tape one of these cards in the inside and read the humidity from the outside of the box. You want the card in your dry box to look like the one on the left, not like the one on the right (or worse.)
If you shine a flashlight on a card, the colors are more intense. I just did this to the card on the right and the blues are bluer and the pinks are pinker than what the image shows.
A gallon of dessicant and muslin bags. This is my first experience with using desiccant and I didn't know how much to buy. But I saw that it was cheaper in bulk, so I bought a gallon.
When I'm done experimenting, the gallon jar of desiccant will be stored in another air-tight box. FWIW.
Since I wrote this page, I tested the dry boxes (with filament) for about a month. Both of them stayed dry. The card dots stayed blue and the humidity measured 18%, or lower. The filament fed into the printer fine. I just needed to open them because I am changing things around. I did a spot check of the dessicant beads and they are still orange.
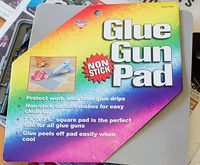
Material I used for making gaskets. I bought it from A.C. Moore. It is made by Nicole and the part number is "GLU 608". Good luck finding it on-line because it doesn't exist on-line. But it is sold as a glue gun pad so Google for that.
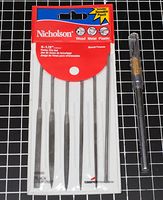
Needle files that I got from Home Depot. (Hmm, these are now about double the price I paid. Cheaper needle files.) And the Xacto knife I used to cut up the glue gun pad/gasket.
Contact me about questions or suggestions
Questions? Write to drybox@frogymandias.org