Indoor/Outdoor ESP8266 WiFi Color Weather Display

Frogymandias
Look on my
works...
This page last modified on 2023-07-19 03:29 PM
These pages are about how to make several variations of the ThingPulse ESP8266 WiFi Color Weather Display (Alternate source)
The versions covered here are focused around displaying weather data that is downloaded from the (free tier) OpenWeather API, but this kit can be used to display other data. We include a version that displays local temperature and humidity using a DHT22 sensor.
Whats's new (2023-07-19 03:22 PM) with the Frogymandias version of the ESP8266 Color Display kit.
Added link to Amazon list of parts for the ESP8266 Weather Station (2023-07-19 03:29 PM) that you might need if want to build a weather station as described on these pages.
You don't need all this stuff. All you need to make a functional weather station is an ESP8266 NodeMCU board, an ILI9341 LCD Display panel, a set of 3.9" F-F Dupont jumpers, a micro-USB power supply and (optionally) a DHT22 Temp/humidity sensor. The rest of the list is mostly hardware I used to assemble the weather station in a case.
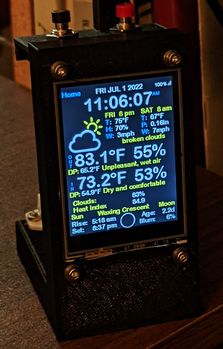

This is a variation without the touch screen functionality (the touch screen used all the I/O pins on the ESP8266) but has a DHT22 temp/humidity sensor installed so it can display both indoor and outdoor temperatures and humidities.
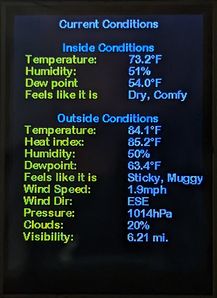
It has (optional) push button switches to restore being able to switch to additional screens. (The screens show more current weather conditions and forecasts for the next four days. And some technical information like free memory, the chip ID number, time of last reboot, erc., mostly useful for developers) These are momentary contact NO (normally open) button switches wired with 10K pullup resistors connected to D3 and D4.
But you don't need to wire switches if you don't want to because you can use the "Flash" button that is on the top of the ESP8266 NodeMCU. to switch between screens. Look at the top of the DHT22 temp/humidity sensor picture, below, to see the small "Flash" button that is just to the left of the USB connection. (The small button to the right of the USB connector reboots the NodeMCU.)
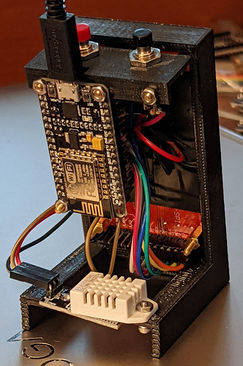
DHT22 temp/humidity sensor
-04_large.jpg)
ESP8266 NodeMCU wiring diagram
Our version uses a different version (NodeMCU) of the ESP8266 (than the ThingPulse kit uses) and doesn't require any soldering (unless you install the button switches.)
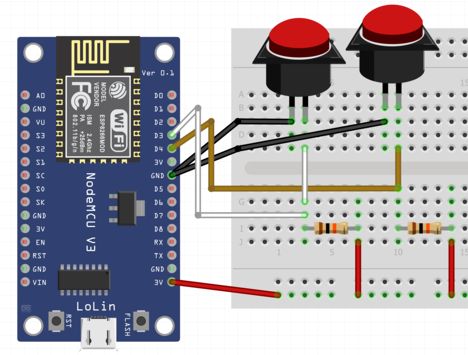
How to wire up screen changing switches
The non-touch version can be non-soldering (it uses F-F Dupont jumpers), it can display both indoor and outdoor temperatures and you can change between screens using the flash button on the NodeMCU. If you want to add switches here is how you wire them up. This will require soldering.
You can experiment by making a fully functional version using the Flash button to switch between screens. If you really like the Color Weather Station, then adding dedicated switches to switch between screens is better for long term use (assuming that you need to switch between screens a lot.)
For the enclosure for this version, I started with a design from Thingiverse and adapted it. Both versions of the Color Weather Station will fit in either enclosure. (But the slant back version is best suited if you want to use buttons to switch between screens.)
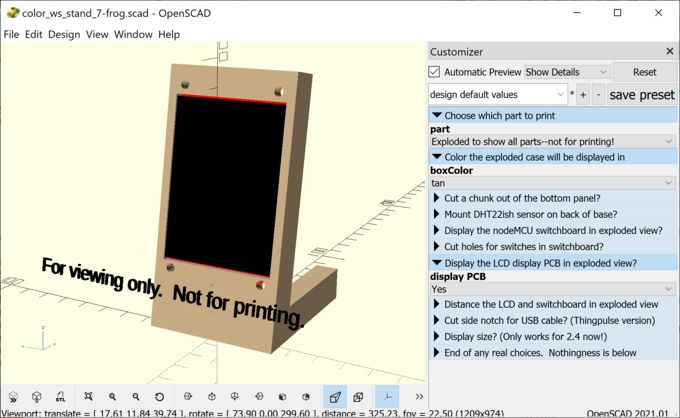
Shows OpenSCAD Customizer so you can make a lot of changes without needing to learn OpenSCAD code
Again, this will be covered in detail on other pages. I include links to OpenSCAD files for the enclosures. And have a link to all the Arduino IDE code. (Both versions are in a single .ino file. I got a lot of mileage out of #ifdef statements and the settings.h file.)
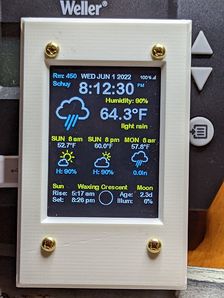
-08.jpg)
This is a version that is mostly the same as the ThingPulse version, but with a few minor enhancements. (It can't measure indoor temp/humidity because the touch screen uses all the ESP8266's I/O pins so there is no way to read an inside temp/humidity sensor.) For the 3D printed case, I started with the ThingPulse OpenSCAD script and made a few enhancements (that will be covered on another page.)
This version maintains using the touch screen to switch to different screens for additional weather information and was built using the ThingPulse kit I got from Amazon.
Quick start. (Will later be put on separate pages.)
Download ESP8266-frg-master.zip (2022-11-27 05:23 PM 82.6 KB) Arduino IDE files.
First download the Arduino IDE as a .zip file, create a PortableApps directory, unzip the .zip file you just downloaded in PortableApps and create a desktop shortcut to Arduino.exe.
Follow the ThingPulse WiFi Color Display Kit instructions here to configure the Arduino IDE. Then add our version to your Arduino IDE sketchbook. After unzipping, rename the esp8266-weather-station-color-2022-frg-master directory to esp8266-weather-station-color-2022-frg
7/19/2023 Open esp8266-weather-station-color-2022-frg-master in Arduino. Switch to the Personal-info.h tab.
Change
String WIFI_SSID = "yourssid";
String WIFI_PASS = "yourpassw0rd";
to match your router's information. Get a free OpenWeather API key by going to https://openweathermap.org/price/ and scroll down to 'Current weather and forecasts collection' and click on 'Free Get API Key' to get an OpenWeather API key. Put your OpenWeather.com API key in OPEN_WEATHER_MAP_API_KEY
Then go to https://openweathermap.org/ and search for a city. The city number will then be in the URL. Example, after searching for 'Canandaigua, NY, USA' the URL will be https://openweathermap.org/city/5111405 5111405 is the OPEN_WEATHER_MAP_LOCATION_ID
Then look through the Settings tab and change anything you need to match your hardware. The defaults should work if you built the NodeMCU version with Dupont F-F jumpers.
6/4/2022 Added code for the not-touch screen version to be able to switch between screens if you have two momentary contact NO switches (or just use the Flash button on a NodeMCU.) The slantback version of the OpenSCAD file has provisions for generating a plate to mount the switches to the NodeMCU. 6/7/2022. Realized that you don't need to wire any switches--you can use the Flash button on a NodeMCU to switch between screens. Update the LOCCATION_NAME settings to taste.
 color_ws_stand_7-frog.scad (2022-07-01 04:43 PM 17.2 KB) Slantback version that can mount screen changing switches. This version is better suited for the no-touch, non-soldering version that uses a NodeMCU ESP8266 and (mostly) F-F Dupont jumpers.
Needs OpenSCAD (Choose the .Zip version, create a PortableApps directory, unzip the OpenSCAD .zip file in PortableApps and create a desktop shortcut to OpenSCAD.exe)
Once you have everything configured and working correctly, both the Arduino IDE and OpenSCAD are installed in a single PortableApps directory that can be copied onto an external drive and then copied to a different computer.
-08_small.jpg) esp8266-ws-color-enclosure-(frog).scad (2022-06-02 07:59 PM 15.1 KB) This rectangular "deck-of-cards" shape is best for the ThingPulse kit that requires soldering. But it is more compact. For preparing
esp8266-ws-color-enclosure-(frog).scad (2022-06-02 07:59 PM 15.1 KB) This rectangular "deck-of-cards" shape is best for the ThingPulse kit that requires soldering. But it is more compact. For preparing .stl files to 3D print an enclosure.