Using a linear file with dcraw and Photoshop
Shot with Canon EOS-M
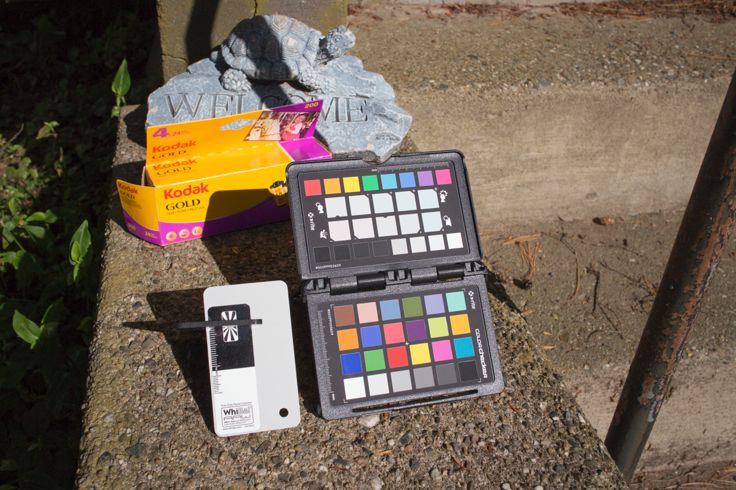
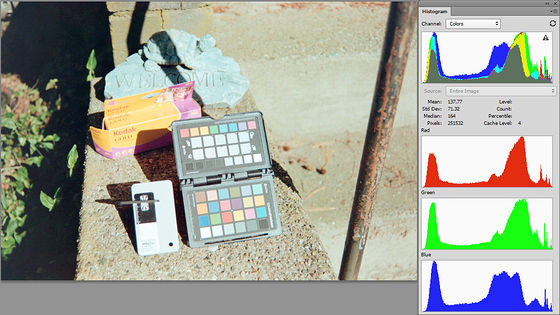
This is a reference. This is the scene shot with a Canon EOS-M. We want to convert the negative so that it looks like this.
You can download the .CR2 file if you want follow along It is about 33 megabytes.
- Use dcraw to make a linear TIFF file.
- Use the ProPhoto color space.
- Load the linear TIFF file that dcraw made.
- Straighten and crop.
- Use Levels to make the R,G, and B channels fill the histogram.
- Invert the image and make it positive.
- Fix the brightness by adjusing gamma with Curves.
- Tweak colors with Curves Auto adjustment.
- Tweak colors more with Hue Saturation.
- Finish up by changing to 8 bit sRGB
Use dcraw to make a linear TIFF file.
dcraw is a RAW converter. I'm not going to explain dcraw here. (Here is a good tutorial on dcraw.) All we need to know is that dcraw can convert RAW files (from camera scanning a negative) into linear TIFF files. Windows users can download dcraw from here. Download the Zip file, unzip it, and copy the dcraw .exe file to be somewhere on your path. If you don't know what this means, then just copy dcraw.exe into the directory you will be working in. (Where the RAW files you made when you camera scanned negatives.
(In the zip file you download, dcraw will have a file name like dcraw-9.26-ms-64-bit.exe. Rename it so it is dcraw.exe.)
Then make a batch file like this:
echo off
echo Uses dcraw to convert a .cr2 file to a linear tiff.
echo For converting camera scanned negatives
echo Drag the TIFF file onto this .bat file.

echo Converting %1
echo to linear file '%~n1.tiff'
echo .

Rem dcraw hints from http://www.guillermoluijk.com/tutorial/dcraw/index_en.htm
Rem -T    Write a TIFF file
Rem -4    Write 16 bit linear file
Rem -w    Use the white balance specified by the camera
Rem -o 0  No color management (we assign a profile later)
Rem -H 0  Clip all highlights to solid white (default)
Rem -H 1  Leave highlights unclipped (Not sure about this.)
Rem %1 is the input file (that is presumed to be dropped onto this .bat file.)

dcraw -v -T -4 -w -o 0 -H 0 %1

pause
Give the batch file a file name like 0-make-linear.bat (Right click on a .bat file and choose "Edit" to edit it.)
Put this batch file (and dcraw.exe, if needed) in the directory where your RAW files are. You can drag-and-drop a single RAW file onto 0-make-linear.bat If you have already created any TIFF files (that have the same file name as your RAW file), the TIFF file that dcraw creates will overwrite any existing TIFF file, with no warning. Check first! You will see something like
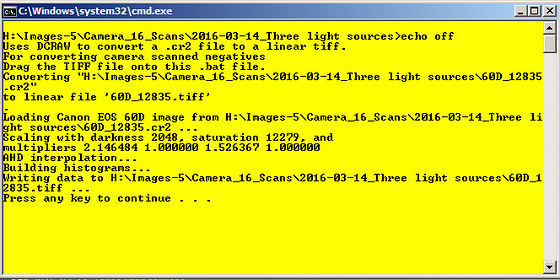
You should see a .tiff file with the same file name as the RAW file you dragged and dropped.
Use the ProPhoto color space.
Open Photoshop. I've found that this process works better if you use ProPhoto as your working space. Click on Edit/Color Settings... You should see
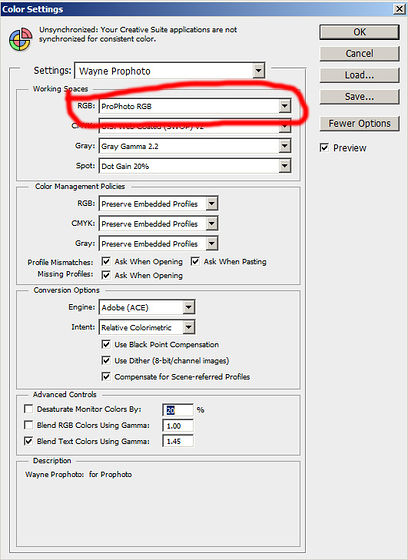
Make sure that "Working Space" is set to ProPhoto. Also make sure that the "Profile Mismatches" boxes are all checked. After clicking on "OK" your status bar should show  (If your lower status bar isn't showing the color space, click on the right triangle and select "Document Profile.")
Load the linear TIFF file that dcraw made.
Now open the linear .tiff file that dcraw just produced. Because the .bat file I told you to run instructed dcraw to not include a profile, Photoshop should display this dialog box.
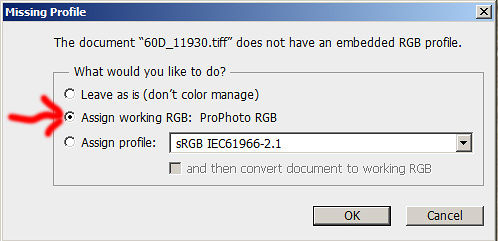
You want to check "Assign working RGB: ProPhoto RGB". Then click on "OK". You should see something like this:
(If you have your histogram visible (Window/Histogram) and have all three colors enabled ("All Channels View" and "Show channels in color".) If not, do so, because you really need to watch what is happening to the R, G, and B channels.)
Straighten and crop.
Straighten and crop the image to remove any sprocket holes, so all you have is image
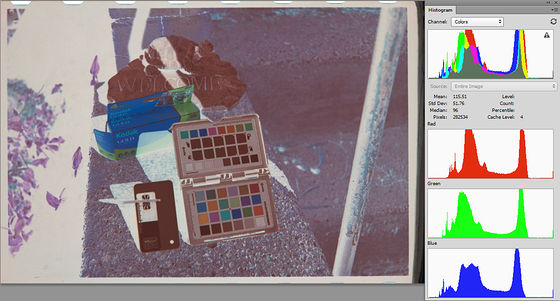
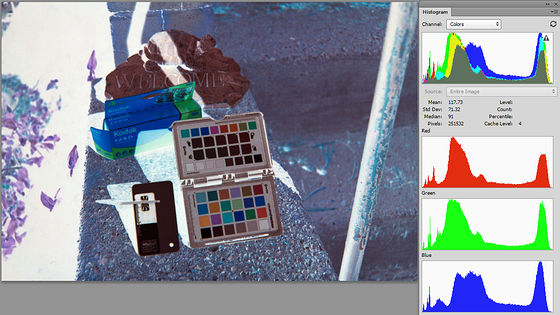
Use Levels to make the R,G, and B channels fill the histogram.
Now we need to make the three channels fill the histogram Open Levels (Ctrl-L)
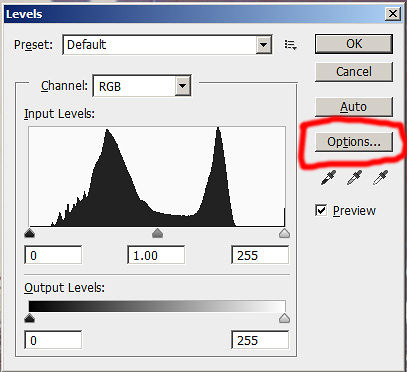
Click on "Options". You will then see.
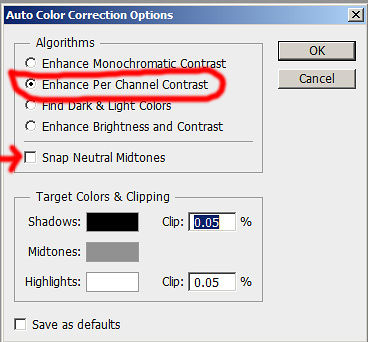
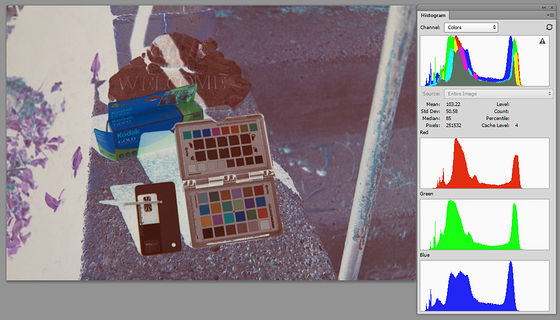
Make sure that "Enhance Per Channel Contrast" is enabled and "Snap Neutral Midtones" is not checked. Click on OK twice to get out of "Options" and "Levels". Your image and histogram should look like this:
Invert the image and make it positive.
Now invert it by pressing Ctrl-I
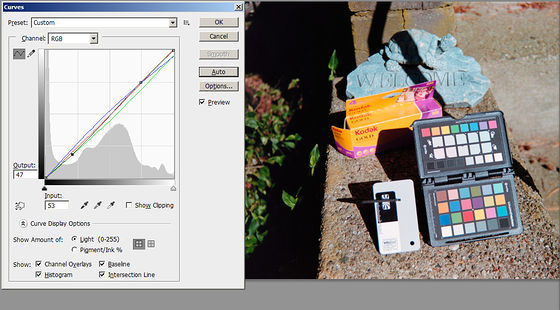
Fix the brightness by adjusing gamma with Curves.
Ohh, it is way too light. This is because we converted from a linear TIFF and and linear TIFF is dark. We need to adjust the gamma to fix the brightness. Open Curves (Ctrl-M)

I knew from looking at my reference image that was taken on an EOS-M that the Mean in the histogram should be a bit below 100 (red arrow in histogram). I dragged the curve down until the mean was a bit below 100. (100 is low for the mean. This image has a lot of black shadow, which is why the mean is low. You usually see something like "128" for the mean.)
When you have the curve adjusted so the brightness looks about right, "OK" out of curves. Ths image should look better.
Tweak colors with Curves Auto adjustment.
But the color is off. Go into Curves (Ctrl-M) again and click on "Options..."
I'm not going to show a screen shot of options again. Look back at the screen shot for "Options..." in the Levels dialog, above. I usually have good luck with "Find Dark and Light Colors" with "Snap Neutral Midtones" checked. But try other options and see if any other look better. If so, then go with whichever one looks best. Click "OK" in the Options dialog (which will bring you back to Curves.
I decided that the image needed a bit more contrast so I added an "S" curve to the RGB curve. Click on the upper part of the curve and drag it a bit up. Click on the lower part of the curve and drag it a bit down.
Tweak colors more with Hue Saturation.
I decided that some of the colors were still off. I opened the Hue Saturation dialog (Ctrl-H) and did fine tuning.
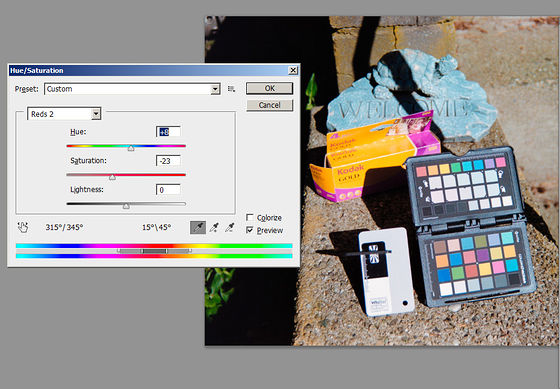
I decided that cyan was too vivid, so I chose "Cyan" from the drop down box and brought the saturation do so the "Welcome" turtle was closer to the reference image (and the real one--this is my front porch). Sometime skies end up look too cyanish, so I go to cyan and change the hue until the sky look bluer. The screen print program caused a glitch. The dialog shows "Reds 2", but I was really in cyan.
But you might need to make similar changes to other colors. I often bounce back and forth between using auto-adjust in Curves and tweaking individual colors in Hue Saturation.
Here is the completed image:
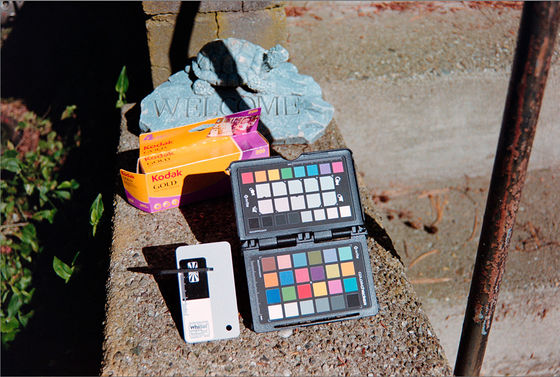
Converted Kodak Gold 200 negative
And here is the reference image taken on an EOS-M
Shot with Canon EOS-M
They don't match exactly, but they are close. And the camera scanned negative looks quite decent, if I may say so myself.
Finish up by changing to 8 bit sRGB
You might want to save the image as it is, in case you want to come back to it and tweak colors. It is now a 16 bit image in the ProPhoto color space. But this isn't too good for sharing or putting on the web (or Facebook, etc.) You should also convert it to 8 bit sRGB and save it as a JPG. Do the profile change first (while it is still in 16 bit mode.) "Edit/Convert to Profile..."
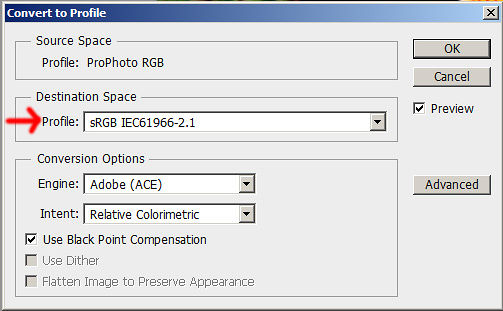
The Destination Space should be sRGB. Click on "OK".
Now convert it to 8 bits. "Image/Mode" and select "8 bits/channel. The Photoshop status bar should show  . Do File/Save As..." to save it.
Questions? Write to camerascanning@frogymandias.org