Installing and Configuring a Raspberry Pi
(And some misc. Linux 101 refreshers.)
These are mostly notes I've taken for myself whenever I need to set up a new Raspberry Pi (or other Linux machine). I forget this stuff if I don't use it all the time.
Some of this is targeted towards Frogdown installation and configuration. The rest is misc. general Linux and Raspberry tips.
- Creating a Raspberry Pi boot SD card
- Configure with raspi-config (if needed)
- Connect with ssh using PuTTY
- Install Perl modules from CPAN
- Install Apache and PHP
- Changing Apache's DocumentRoot
- Enable the new Apache2 configuration
- Doing things with PHP
- ImageMagick image resizer (and much more)
- Make short commands for directory changes you always do after logging in
- Cloning your system disk to another SD card
- Use a static IP address
- Use Samba to share Pi directories with Windows machines
- Systemd Cheat Sheet
- apcupsd Monitors an APC UPS (for graceful shutdown)
- Installing apcupsd
- apcupsd sendEmail
- apcupsd Multimon
- Finding IP addresses
- Use the Markdown markup language (which is a real easy install)
- Make an executable script
- Display Raspberry Pi ARM CPU temperature
- Read ambiant temperature and humidity with a DHT22 sensor
- Deprecated
There is already a lot of good documentation on how to set up a Raspberry Pi. I'm not going to try to duplicate it!
https://www.raspberrypi.com/documentation/computers/configuration.html
But I will cover things that other documentation might overlook.
Creating a Raspberry Pi boot SD card
Get a High Endurance micro SD card! A Raspberry Pi does a lot of writing and regular SD cards will go bad quickly. Sandisk does not warranty non-Endurance cards if they are used as an operating system.
Mount the SD card in a reader and check that you computer recognizes it. Then use the Raspberry Pi Imager to write the Raspberry Pi operating system to the card.
You can view the 45 second video. But it skips over configuration very fast. You will have an easier time if you spend some time in the configuration Advanced Options window before you burn your SD.
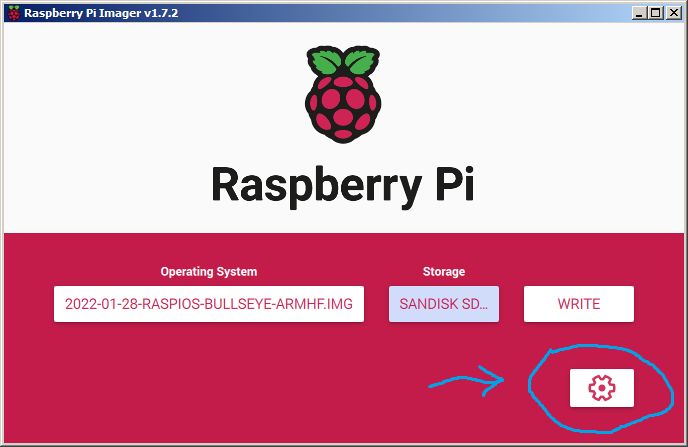
Raspberry Pi Imager with 'Advanced Options' button highlighted.
Click on the gearbox button to get to the "Advanced Options" screen. They aren't that Advanced and you need to configure all of them anyway. Better to do it now than after you burn the SD, boot your Pi and wonder why a lot of things aren't working. (Why does my keyboard act funny? Why can't I get to the Internet? etc.) The default country is England.
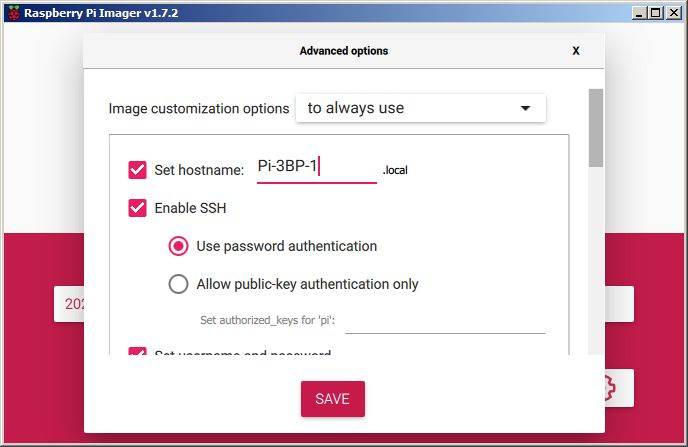
Raspberry Pi Imager
Scroll through. Set a hostname (Can only use letters, numbers, and "-" NO OTHER CHARACTERS.) This shows up in the command prompt so you can identify which Pi you are working on in a PuTTY window (if you end up with multiple Pis. And you will.) Enable SSH with "Use Password authentication". Username "Pi" and dream up a good password. Write the password down.
Configure wireless LAN (WiFi) with your router's SSID and password, and LAN country (different countries use different protocols. Again, the default country is England.) Set locale settings. Then "SAVE" Then click on "WRITE".
When it is done writing, unmount the SD card reader, remove the micro-SD, put it in your Raspberry Pi and plug the power cord in. (At this stage you should have a keyboard, mouse, and monitor connected to the Pi.) It should boot.
Configure with raspi-config (if needed)
If you didn't get all the configuration correct before you wrote the SD card, you can use raspi-config to redo them.
sudo raspi-config
Pis must be shut down properly before you remove the power.
sudu reboot (shutdown -r now)
sudo halt   (shutdown -h now)
Optional
sudo apt update
sudo apt list --upgradable
sudo apt full-upgrade   # -y

man apt ...
Connect with ssh using PuTTY
Use PuTTY for sshing (terminal) and WinSCP for copying files between your Windows machine and your Raspberry Pi (WinSCP acts a lot like Windows File Explorer--no command line).
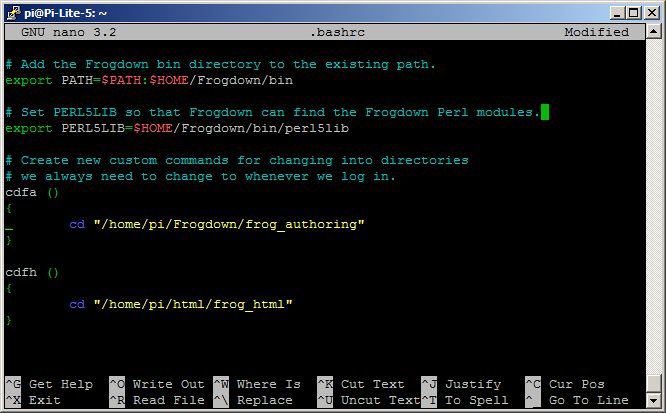
SSH terminal running the nano text editor editing ~/.bashrc
Use PuTTY to log into your Pi. You will need your Pi Password,
I'll assume that you will create a C:\Putty directory to hold your keys. Use PuTTyGen to generate a public/private key pair. Click Save Private key to C;\Putty\pi.pk
To get a public key that OpenSSH can use, do NOT click Instead, create a new C:\Putty\Pi.txt file. Open C:\Putty\Pi.txt in Notepad. Copy the "Public key for pasting into OpenSSH authorized_keys file" and paste it into C:\Putty\pi.txt (It should start with ssh-rsa) Save C:\Putty\pi.txt
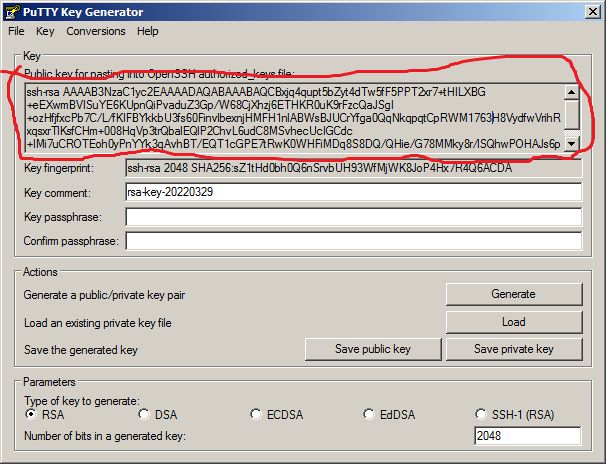
PuTTYGen
The public key is sill in your clipboard. Now to put it into your Pi where it belongs, switch to the PuTTY Window
cd ~
mkdir .ssh
chmod 700 .ssh
ls -la

drwx------ 2 pi   pi   4096 Apr  5 19:51 .ssh

cd .ssh
touch authorized_keys2
chmod 600 authorized_keys2
nano authorized_keys2
Paste the public key you copied to the clipboard into nano by using your right mouse button,
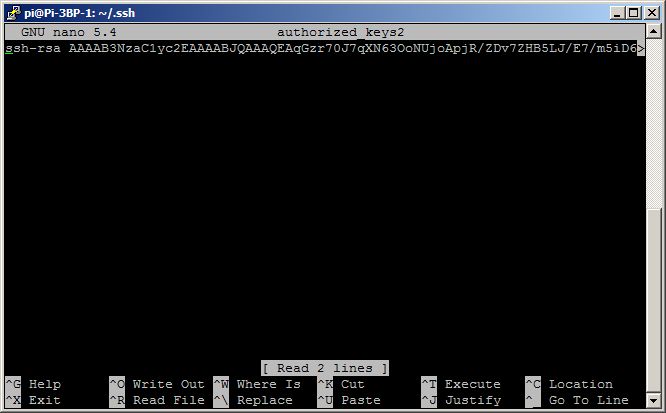
nano, after pasting your public key in
Save (Write Out) authorized_keys 2 with Ctl-O, Exit nano with Ctl-x.
ls -l

-rw------- 1 pi pi 407 Apr  5 19:51 authorized_keys2
Start a new PuTTY session and enter the Pi's IP address in "Host Name (or IP address). Type something like Pi 3BP (Your Pi's hostname) into "Saved Session". Click
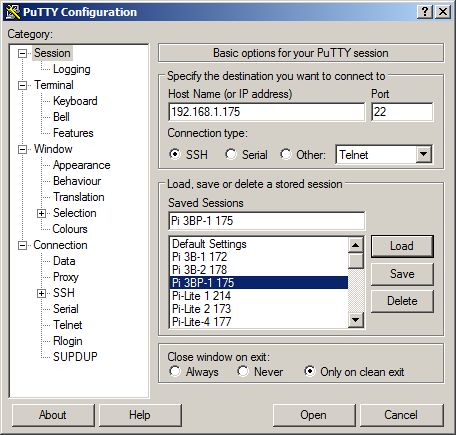
PuTTY Session screen
Switch to the Connection/Data window and put "pi" in the "Auto-login username.
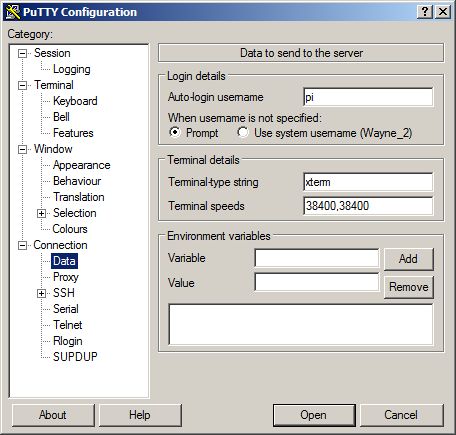
PuTTY, Connection/Data screen
Switch to the Connection/SSH/Auth window and Browse to C:\Putty\pi.ppk
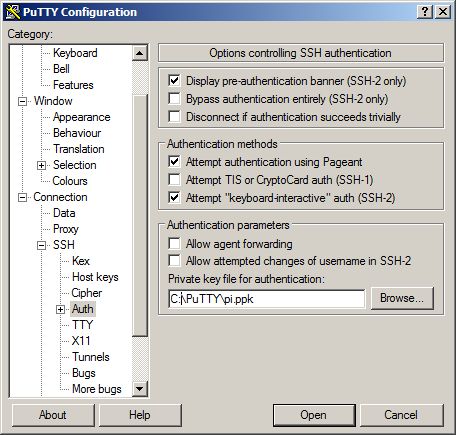
PuTTY, Connection/Data/Auth screen
Then go back to the "Session" window and click on again (otherwise, the configuration changes you just did won't be saved.)
Now should open an SSH window on your Pi without asking you for a password. If it still asks for a password, review the above steps.
Configure WinScp similarily.
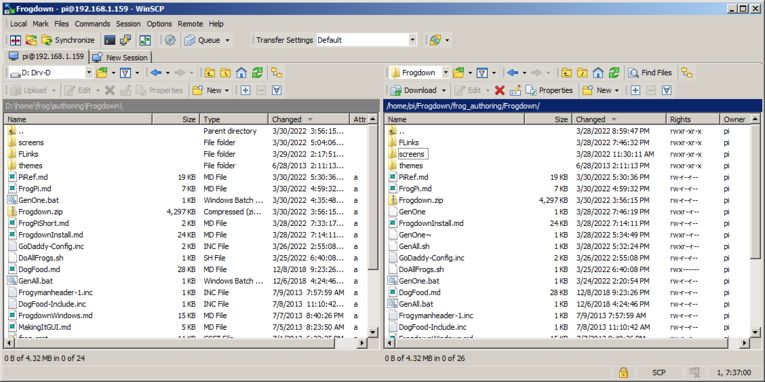
WinSCP. Left is local Windows. Right is remote Raspberry Pi. Drag-and-drop to copy files.
Install Perl modules from CPAN
Installing CPAN modules
sudo apt update
sudo apt install curl
curl --version
sudo curl -L http://cpanmin.us | perl - --sudo App::cpanminus
cpanm --version | less
https://forums.raspberrypi.com/viewtopic.php?t=13410#
after this, install CPAN perl modules like
sudo cpanm Digest::MD5
sudo cpanm Date::Calc
Install Apache and PHP
Disclaimer! What I am showing with Apache and PHP isn't safe to expose to the real Internet. It is only for running on your Raspberry Pi on your own subnet; so you can experiment with a real web server so you can later do the same thing on a hosted server, like GoDaddy. Don't try to expose your Pi to the real Internet by opening up your firewall!
Code generated by Frogdown is pure HTML which can be put on a real server. Frogdown itself operates where the real server can't see, so it is safe to run on a real server.
sudo apt update
sudo apt install apache2
sudo apt install php libapache2-mod-php
Apache's DocumentRoot (where the .html files go and are served from) defaults to /var/www/html The only thing is that it is owned by root. If you want to go with the stock DocumentRoot and you control this Raspberry Pi then you need to take ownership of /var/www/html (If you do not control this Raspberry Pi then you need to ask the person who does how to proceed.)
To take ownership, change to /var/www (assuming that you are the 'Pi' user):
chown -R pi:pi html
ls -la should show
drwxr-xr-x  3 root root 4096 Mar 31 15:49 .
drwxr-xr-x 12 root root 4096 Mar 31 15:49 ..
drwxr-xr-x  3 pi   pi   4096 Apr 10 19:00 html
Meaning that Pi now owns the html directory tree. (Now we are definitely into the kinds of things that shouldn't be done on a server that is exposed to the Internet.) If so, then the only thing you might need to change is ~/Frogdown/etc/markcms/frog-site.cfg and make sure that
BaseOutDir = /var/www/html
Cool! now you can jump right to #Installing ImageMagick
Changing Apache's DocumentRoot
Only do this if you can't use Apache2's default DocumentRoot of var/www/html
If you aren't able to use Apache2's default DocumentRoot of /var/www/html then you need to change Apache's configuration so Apache's DocumentRoot points to (say) ~/Frogdown/frog-html. Apache2's (many!) config files are in /etc/apache2
From https://www.digitalocean.com/community/tutorials/how-to-set-up-apache-virtual-hosts-on-debian-8
or
https://www.pontikis.net/blog/debian-jessie-web-server-setup
And also
To change Apache's DocumentRoot to /home/pi/frog_html (So Apache knows to get your web pages from /home/pi/Frogdown/frog_html)
As the pi user...)
cd /etc/apache2
sudo nano apache2.conf
Scroll to the end and then add
<Directory /home/pi/Frogdown/frog_html>
    Options Indexes FollowSymLinks
    AllowOverride None
    Require all granted
</Directory>
^o to save, ^x to exit
(We are assumed to already be in /etc/apache2)
cd sites-available
sudo cp 000-default.conf default.conf
sudo nano default.conf
Change DocumentRoot so it is /home/pi/Frogdown/frog_html
Change any references of /var/www/html to /home/pi/Frogdown/frog_html (assuming that you are the 'Pi' user.)
Save and exit nano.
Enable the new Apache2 configuration
sudo a2ensite default.conf
Disable the old configuration
(Removes the symbolic link in /etc/apache2/sites-enabled )
sudo a2dissite 000-default.conf
Now restart apache
sudo systemctl reload apache2
Might need to also do
sudo systtemctl daemon-reload
Apache should now point at /home/pi/Frogdown/frog_html
To test it, change to ~/Frogdown/frog_html and type nano index.html Type anything you want and Ctrl-O Save
Enter the IP of your Raspberry Pi in your web browser. (The IP address of your Pi is 'hostname -I') You should see whatever you typed in nano just now. Type something else in nano and Save. Refresh your browser. You have just created a dynamic site. :-)
While you are still editing index.html in nano add,
<a href="Frogdown">Go to the Frogdown page</a>
And save. Refresh your browser. This should show a link to the Frogdown documentation (that will be created when you finish installing Frogdown. For now, it is a dead link.)
Doing things with PHP
You don't need to be here to configure Frogdown. This is for when you have learned how to create web sites with Frogdown and want to go on to more advanced things.
With that said, PHP should be working. To test, create in your html directory phpinfo.php that has a single line
<?php phpinfo(); ?>
Access phpinfo.php from your web browser. For instance, if the IP address of the Pi you are using is 192.168.0.22 then enter 192.168.0.22/phpinfo.php This should display a whole lot of information about how PHP is configured. Search for include_path. On my Pi, it defaulted to .:/usr/share/php, which isn't too user friendly for us to develop with. So let's add ~/Frogdown/php to the PHP include path. First, create (if it doesn't already exist) ~/Frogdown/php
(Maybe open up a new terminal window here) Now we change php.ini to include this. Scroll back to the top of the phpinfo.php page and see where php.ini is located. On my fresh (late March 2022) Raspberry Pi OS, it says /etc/php/7.4/apache2/php.ini So change to /etc/php/7.4/apache2. (ls to make sure that php.ini is there.) Make a backup of php.ini (sudo mv php.ini php.ini.bak) Then sudo nano php.ini
Search (Ctl-W) for include_path; It will probably be
;include_path = ".:/usr/share/php"
The semicolon ';' at the beginning of the line means that it is commented out. So remove the ';' at the beginning of the line. Then add :/home/pi/Frogdown/php to include_path. You should end up with
include_path = ".:/usr/share/php:/home/pi/Frogdown/php"
Save (Crl-O) and exit (Ctl-X) and reload Apache 2
sudo systemctl reload apache2
Refresh the browser that is displaying phpinfo.php. It now should show
include_path .:/usr/share/php:/home/pi/Frogdown/php
To test, edit phpinfo.php so it is
<?php
    require 'hello.php';
    phpinfo();
?>
Then cd ~/Frogdown/php and nano hello.php
<?php
    print "<p>I'm here</p>\n";
    print "<p>Now let's see some configuration information</p>\n\n";
?>
(Because we are in PHP we can't just write regular HTML. So we use PHP's print statement to print out the HTML we want to display.)
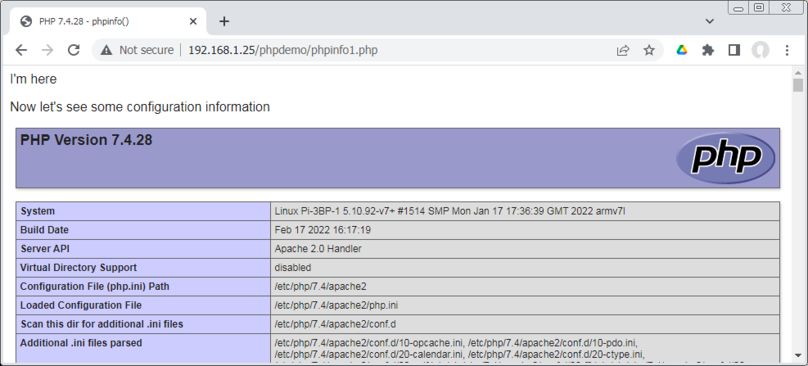
Our modified phpinfo.php page.
Note if you do Ctrl-U to view source, you won't see any of the PHP code. What you will see is something like
<p>I'm here</p>
<p>Now let's see some configuration information</p>

<!DOCTYPE html PUBLIC "-//W3C//DTD XHTML 1.0 Transitional//EN" "DTD/xhtml1-transitional.dtd">
<html xmlns="http://www.w3.org/1999/xhtml"><head>
<style type="text/css">
Because the PHP code is executed on your Apache2 server, what you see is the output of the PHP code. In this case, two print statements followed by a whole bunch of HTML that is generated by the phpinfo() function. This is the point of a language like PHP: to execute code that will generate HTML that the user's browser displays.
Now we are set up to do stuff.
(To be continued. Or you can Google for PHP examples, like I did just now to figure out how to configure PHP because I last did it a bunch of years ago and forgot the details.)
ImageMagick image resizer (and much more)
ImageMagick is a real good program for to converting image files. Frogdown uses ImageMagick to resize images to be the correct size for the web page.
sudo apt update
sudo apt install imagemagick
--------------------End of Frogdown specfic information-------------------
Make short commands for directory changes you always do after logging in
Make .bashrc functions to shorten directory changes. i.e. sudo nano ~/.bashrc and go to the end of the file
alias lll="ls -lha"

cdfa ()
{
    cd "/home/pi/Frogdown/frog_authoring/Frogdown"
}

cdfh ()
{
    # Apache2 default DocumentRoot
    cd "var/www/html/Frogdown"
    # If you reconfigured DocumentRoot
    #cd "/home/pi/html/frog_html/Frogdown"
}
https://linuxize.com/post/how-to-create-bash-aliases/
Cloning your system disk to another SD card
If you have spent a lot of time getting your operating system configured just so, it is really comforting to make a backup of your boot SD. Here is how:
Cloning your system disk to another midro-SD card
Use a static IP address
This didn't work in older versions of Raspbian but I just checked and did work in the latest (as of 3/30/2022) version of the Raspberry Pi OS.
The current network is probably wlan0 if connected by WiFi; eth0 if by wired Ethernet. Check with ifconfig.
Find current IP: hostname -I
Router gateway: ip r | grep default
Current DNS: cat /etc/resolv.conf
To set static IP, sudo nano /etc/dhcpcd.conf
interface NETWORK
static ip_address=STATIC_IP/24
static routers=ROUTER_IP
static domain_name_servers=DNS_IP
Real example (wired Ethernet)
interface eth0
static ip_address=192.168.1.25/24
static routers=192.168.1.254
static domain_name_servers=192.168.1.254
A potential problem with a static IP is you don't want to collide with addresses that your router assigns with DHCP. So go into your router's admin and find what IP range is used to assign DHCP. Then make your static IP be outside this range!
Another potential problem is if you take your Pi to some other network. You really don't want to be using an IP address that any other device is using!
The best way to check is to ping the address you want to use as a static IP before assigning it to your Pi. Which isn't foolproof because another device that uses the same IP may come up at any time. This is why network admins really hate static IPs and want everybody to use DHCP. (You shouldn't have a problem if you are on your own LAN and are sure of the IP range that your router is restricted to for DHCP.)
Source: How Do I Set a Static IP Address on Raspberry Pi?
An alternate way of faking static IPs is to use DHCP IP reservation in your router's admin.
Use Samba to share Pi directories with Windows machines
Which make editing and copying files from your computer to your Pi be a lot easier.
https://pimylifeup.com/raspberry-pi-samba/
sudo apt update
sudo apt install samba samba-common-bin
Make a Samba password for the Pi user
sudo smbpasswd -a pi
Edit the Samba config file to add the share.
sudo nano /etc/samba/smb.conf
Change the workgroup (if needed) and then add
[share]
    path = /home/pi
    available = yes
    valid users = pi
    read only = no
    browsable = yes
    public = yes
    writable = yes
to the end
Then do
sudo systemctl restart smbd
sudo systemctl restart nmbd
You may need to do
sudo systemctl enable smbd
sudo systemctl enable nmbd
https://forums.raspberrypi.com/viewtopic.php?t=249436
Know the host name of your Pi
hostname (Gives you the host name of that Pi)
If Samba is working you can access it from Windows Explorer by putting
\\hostname-of-pi in Windows Explorer's address bar.
Log in as "Pi" and use the password you gave when you set up Samba (above.)
Systemd Cheat Sheet
sudo systemctl start apcupsd
sudo systemctl stop apcupsd
start stop restart enable disable is-active is-enabled
journalctl -f
-u apcupsd
apcupsd Monitors an APC UPS (for graceful shutdown)
Desktop machines don't like unexpected power outages. A UPS (Uninterruptable Power Supply) provides AC power when the power goes out. But only for a number of minutes; long enough to do a graceful shutdown. If you are in front of your computer you can do the graceful shutdown yourself. But if you are away from your computer, it is good to have a program monitor the state of the UPS and automatically shut down the computer before the battery in the UPS is exhausted.
apcupsd is such a program. It works with (most) APC brand UPSs. apcupsd is open source and runs on Linux and Windows (and probably on Macs.)
You need to get a UPS that has a PowerChute USB port so apcupsd has something to monitor. A lot of the cheaper APC UPSs don't have the USB port and can't be monitored.
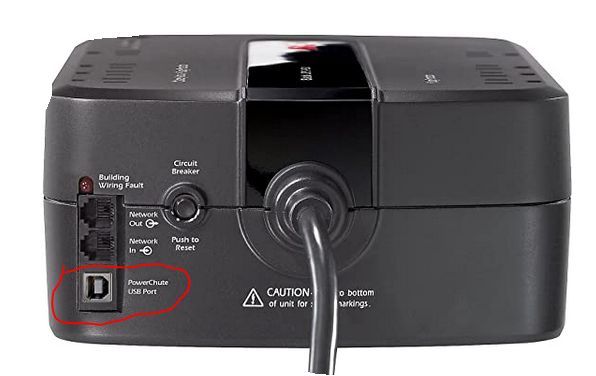
Has PowerChute USB port.
Again, apcupsd only works with APC brand UPSs. Also, if you have a modern APC SmartUPS, you probably will need to add an AP9620 Legacy SmartSlot Card.
Installing apcupsd
sudo apt update
sudo apt install apcupsd
In /etc/default/apcupsd change ISCONFIGURED=no to ISCONFIGURED=yes
sudo nano /etc/apcupsd/apcupsd.conf
Variables to watch out for
#UPSNAME myups # Leave commented out
UPSCABLE usb   # (smart)
UPSTYPE usb    # (apcsmart)
# Generally leave DEVICE commented out if you are using USB
#DEVICE        # (/dev/ttyS0)  (/dev/ttyUSB0)
BATTERYLEVEL 30
MINUTES 20
TIMEOUT 0      # (Use a small amount of seconds to test real shutdown)
NETSERVER on
NISIP 0.0.0.0  # To broadcast to multimon.cgi
Plug in USB cable
lsusb # Lists USB devices
You should see something like
Bus 001 Device 004: ID 051d:0002 American Power Conversion Uninterruptible Power Supply
You may need to reboot if American Power Conversion Uninterruptible Power Supply isn't showing up in lssub.
sudo systemctl restart apcupsd

apcaccess status  # Should show a lot of UPS related stuff.

sudo systemctl enable apcupsd (or 'disable')
apcupsd sendEmail
In order for apcupsd to send alert emails... install SendEmail
sudo apt-get install sendemail
sendemail # Will display options
For TLS (which may need to be configured!)
sudo apt-get install libio-socket-ssl-perl
# Maybe not... sudo apt-get install libnet-ssleay-perl
sendEmail -o tls=no -f FromUser@RealDomain.com -t ToUser@ToDomain -xu
YourEmail@gmail.com -xp YOURPASSWORD -s YourMailServer -u "Hello from
sendEmail" -m "I'm testing sendEmail from the command line."
/usr/bin/sendemail
/sbin/apcaccess
(Then adapt the apcontrol script(s) to use sendEmail instead of the
default mail)
apcupsd Multimon
To get multi-mon running
sudo apt install apcupsd-cgi
sudo nano /etc/apache2/apache2.conf
Add
# Was needed for apcupsd multimon.cgi
ScriptAlias /cgi-bin/ /usr/lib/cgi-bin/
to the end of /etc/apache2/apache2.conf
enable CGI
sudo a2enmod cgi
sudo service apache2 restart
sudo systemctl restart apache2
Look at /etc/apcupsd/hosts.conf
Will show up as http://YOUR_SERVER_IP/cgi-bin/apcupsd/multimon.cgi
http://192.168.1.214/cgi-bin/apcupsd/multimon.cgi
Finding IP addresses
How to find your Raspberry Pi's IP address
Linux, type hostname -I in a shell.
To find all active IPs on a subnet
sudo apt install nmap (if needed)
nmap -sn 192.168.1.0/24
or
nmap -sn 192.168.1.0/24 | grep Nmap
Use the Markdown markup language (which is a real easy install)
Markdown is what Frogdown is built around. It is limited compared to Frogdown, but is a lot easier to install on a machine. If you want to easily make a few .html files.
Make sure that Perl is working
perl -v
Download Markdown.pl from
https://daringfireball.net/projects/markdown/
and put it in ~/bin chmod Markdown.pl to be executable (chmod 744 MarkDown.pl),
Process like
cat PiRef.text | Markdown.pl > PiRef.html
Will make PiRef.html
Make an executable script
cd ~
mkdir bin
cd bin
touch ll
chmod 733 ll
jstar ll
ls -ahl $1 $2 $3 $4 $5 $6 $7 $8 $9
^kx # save and exit.
ll will now display in long format, formatted more human friendly, and will display hidden (.) files.
AdaFruit Wireless Keyboard and Mouse
To use with a Raspberry Pi, change the keyboard to USA PC104 layout:
- Switch to root user.
- Run `dpkg-reconfigure locales` and change from en_GB.UTF-8 to en_US.UTF-8.
- Run `dpkg-reconfigure keyboard-configuration` and change the keyboard to USA PC104 (again, change as needed).
Display Raspberry Pi ARM CPU temperature
Display Raspberry Pi ARM CPU temperature
Bash:
#!/bin/bash
cpu=$(</sys/class/thermal/thermal_zone0/temp)
echo "$((cpu/1000)) c"
Perl:
#!/usr/bin/perl -w

my $cpuTempC = `cat /sys/class/thermal/thermal_zone0/temp`;
$cpuTempC = $cpuTempC / 1000;
chomp($cpuTempC);
my $cpuTemp = ($cpuTempC * (9/5)) + 32;       # Celsius to Fahrenheit
my $cpuTempCs = sprintf("%.1f C", $cpuTempC); # Format to one decimal place
my $cpuTemps = sprintf("%.1f ", $cpuTemp);

print "$cpuTemps ($cpuTempCs)\n)";
Read ambiant temperature and humidity with a DHT22 sensor
4/4/2022 I found a newer project (than the one that I used to use):
Pi with a DHT22
Set up temperature sensors in your home with a Raspberry Pi
I also found a lot of projects that didn't install on the current version of Raspberry Pi OS. I won't link to them. This is the code I ended up with. (From the above-linked article:) First install the Adafruit library.
# Install pip3
sudo apt-get update
sudo apt-get install python3-pip

# Install the Adafruit DHT sensor library
sudo pip3 install Adafruit_DHT
Then create (say) nano humidity.py (This is a simplified version of the sample code in the above linked article.)
#
# https://opensource.com/article/21/7/temperature-sensors-pi
# (Sort of)

import Adafruit_DHT

DHT_SENSOR = Adafruit_DHT.DHT22

# DHT_pin is the GPIO number which is physical pin 7
# Read the above linked article for more details on wiring.
# Also, the pins on DHT22s aren't standarized either. Check!
DHT_PIN = 4

def celsius_to_fahrenheit(degrees_celsius):
        return (degrees_celsius * 9/5) + 32

while True:
    humidity, temperature = Adafruit_DHT.read_retry(DHT_SENSOR, DHT_PIN)

    if humidity is not None and temperature is not None:
        # Celsius
        #print("Temp={0:0.1f}*F  Humidity={1:0.1f}%".format(temperature, humidity))
        # Fahrenheit
        print("Temp: {0:0.1f}*F, Humidity: {1:0.1f}%".format(celsius_to_fahrenheit(temperature), humidity))
    else:
        print("Failed to retrieve data from humidity sensor")
After saving this type Python3 humidity.py (It will display temperature and humidity until you break out with Ctl-C.)
If this doesn't work at some future time, then do what I did: Google for 'Raspberry Pi DHT22' Eventually you'll find one that works.
Raspberry Pi Zero Guide: Projects, Specs, GPIO, Getting Started has, among other things, a real good chart of GPIO pins.
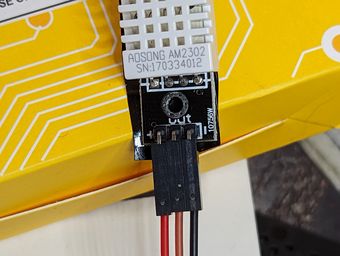
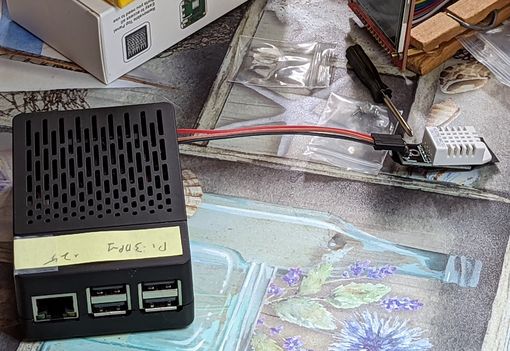
DHT22 with black tape on the back to prevent shorting
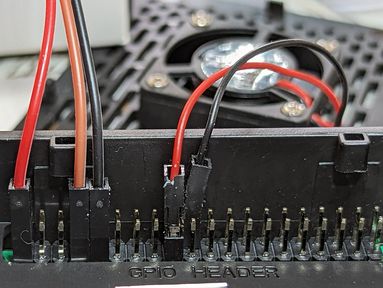
The fan jumpers are gnarled from me trial-and-erroring with needle nose pliers
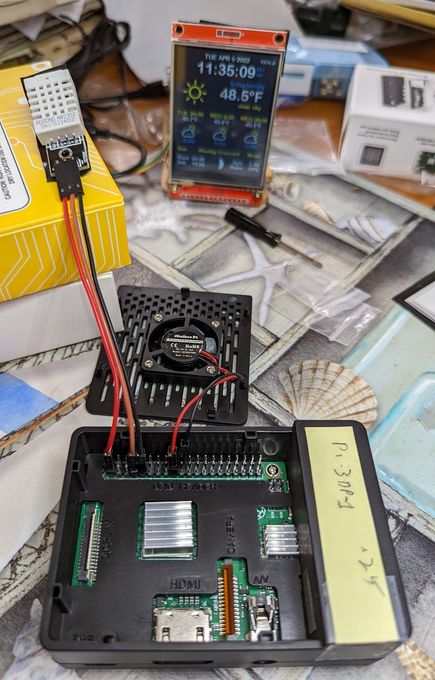
Pi with a DHT22
iUniker Raspberry Pi 3 B+ Case with Raspberry Pi Cooling Fan
DHT22/AM2302 Digital Temperature And Humidity Sensor
And maybe DHT11 Sensor With Raspberry PI and Python (has deeper information about configuring the interface GPIO pins. And about Adafruit Curcuit Python
Deprecated
The above DHT22 code run on a Raspberry Pi 4 B displays
Traceback (most recent call last):
  File "/home/pi/Adafruit/humidity.py", line 18, in <module>
    humidity, temperature = Adafruit_DHT.read_retry(DHT_SENSOR, DHT_PIN)
  File "/usr/local/lib/python3.9/dist-packages/Adafruit_DHT/common.py", line 94,
  in read_retry
    humidity, temperature = read(sensor, pin, platform)
  File "/usr/local/lib/python3.9/dist-packages/Adafruit_DHT/common.py", line 80,
  in read
    platform = get_platform()
  File "/usr/local/lib/python3.9/dist-packages/Adafruit_DHT/common.py", line 63,
   in get_platform
    raise RuntimeError('Unknown platform.')
RuntimeError: Unknown platform.
Possibly because Adafruit now says
The code runs fine on a Pi Zero W and on a Pi 3B+, both using the most recent Raspberry Pi OS (as of March, 2022).
Also, Installing CircuitPython Libraries on Raspberry Pi on a Pi 4B totally corrupted the kernel so it was unbootable. It kept looping on "firmware not found", so I needed to reflash. Possibly something is deprecated here?
Ah, enough for today. Maybe I'll come back on another day and delete rewrite this section.